Although having separate Windows7 user accounts increases security, there are a few disadvantages to overcome when there are many user accounts associated with one computer. The most important of these disadvantages is that more accounts mean that a hacker has that many more opportunities to gain unauthorized access to the computer or server.
One way to combat this disadvantage is to enable certain account policies that automatically limit a hacker’s ability to gain access to a user’s account. Enabling account lockout policies is one of the most powerful ways to thwart thieves, hackers, and other people wanting to steal your files, personal information, or other sensitive information.
Why Enable Lockout Policies?
Enabling lockout policies helps prevent unauthorized use of someone’s Windows 7 account. Of course, it doesn’t completely prevent unauthorized access; it simply makes it much harder for someone to continually input password after password when trying to gain access to someone’s account.In work environments, employees often share account information such as usernames and passwords. Often, one employee will try to use another employee’s account by guessing at the password. Some social engineers will try to gain as much information about a user’s password and then attempt an intelligent guessing attack by trying different combinations of a password on an account. For these reasons and others, it makes sense to enable an account lockout policy.
How to Enable Windows 7 Account Lockout Policies
There are three Windows 7 policies associated with account lockouts. To view the current settings for these polices, begin by logging into Windows 7 with an account that has administrative privileges. Then, click on Start>All Programs>Administrative Tools>Local Security Policy.
In the left hand pane of the Local Security Policy window, locate and click on a folder titled Account Policies and then on the folder titled Account Lockout Policy.

Notice that there are only three policies located in the right hand pane. These are the policies that control account lockout. Right click on the policy titled Account Lockout Threshold and choose Properties from the menu. This policy is the one that enables account lockout and allows you to set values for the other two policies.
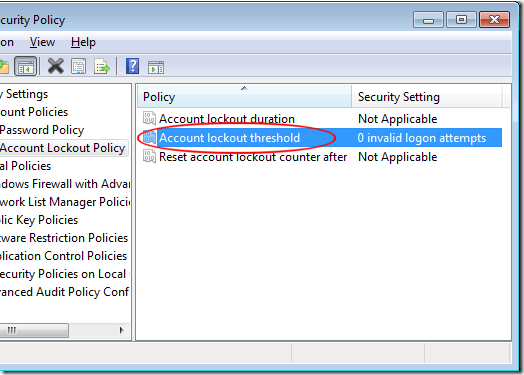
The Account Lockout Threshold is a security setting that determines the number of failed login attempts before that account is locked out. Possible values for this policy range from 0 to 999. A value of zero means that accounts are never locked out regardless of the number of failed login attempts.
Set this value to a reasonable number such as 5. You need to leave at least a few failed login attempts because of a misremembered password or because the user accidentally has Cap Locks on while attempting to login.
Click the OK button and notice that Windows 7 recommends you set the next two policies to 30 minutes each. Click the OK button and locate the next policy titled Account Lockout Duration. Right click on it and select Properties from the menu.

Notice that Windows 7 has already set this policy to 30 minutes. This policy sets the number of minutes an account that has been locked out remains locked out before it is automatically unlocked.

You can set the account lockout duration to any value between 0 and 99,999 as long as it is equal to or greater than the Reset Account Lockout Counter After policy. After setting the Account Lockout Duration variable, click OK and locate the policy titled Reset Account Lockout Counter After. Right click on this policy and select Properties from the menu.

Notice, again, that Windows 7 has set this policy to a value of 30 minutes. The Reset Account Lockout Counter After policy sets the number of minutes that must elapse after failed login before the failed login counter resets back to zero. The value for this policy can be anything from 1 to 99,999 minutes but must be equal to or less than the value set for the Account Lockout Duration policy’s value.

Enabling the account lockout policies on your Windows 7 PC can increase security by reducing the number of times a user or an unauthorized individual can attempt to login to the computer.
However, setting the number of failed logins before lockout too low can increase administrative workload to the point of annoyance for both computer technicians and users. Be careful about the values you set for the three lockout polices to strike a balance between security and usability.
This comment has been removed by the author.
ReplyDeleteA value of 0 on account lockout duration will require the user to contact appropriate administrators to unlock the account manually....so even if you set the account threshold to 5 for example...why not always keep the value to 0 for the account lockout duration? I never understood why not. I have to check this on my server and see what happens.
ReplyDelete