Pages

Friday 22 June 2012

How to Remove or Reset a BIOS Password


It could be a big hassle if someone forgets his/her BIOS password.  It means you can’t change anything on the BIOS like enabling a specific hardware, CPU time or changing the order of boot sequence.

There are many tips posted on the Net on how to solve this topic but let me summarize some of the best of these tips for you here.

Tip #1:  Remove and replace the CMOS battery.  Removing a CMOS battery will cause you BIOS memory containing the password to be cleared.   All of the information on the BIOS will be reset so this process assumes that you know your hardware and BIOS setup before attempting it.  The CMOS battery looks like an ordinary watch battery and you can remove it with a small flat screwdriver.  Make sure to unplug the power of your computer to avoid electric shock.


Wait about 20 minutes before putting it back on the motherboard.  After that, turn on your computer.  You should see a fresh BIOS boot wherein you may need to configure your hardware and CPU time into the BIOS screen (since we cleared everything up).


Tip #2: Use a software to crack your BIOS password.  BIOS passwords are encrypted on your BIOS memory so it is easily readable by software that can crack the password.  Upon research from filefront.com I got this utility called Elevent Alliances Bios:

http://files.filefront.com/Eleventh+Alliances+Bios+v+32/;5061958;/fileinfo.html

image

It is a DOS based executable so I run it using the command prompt.  Type cmd on the Start > Run window:

image

Then call “bios320.exe” to the command line (I saved the executable file to my C drive):

image

You should see the menu where you can choose to read about the software of just go directly to the “Crackers” menu and choose your BIOS type using up and down arrows.  You will not be able to use the mouse to choose menu items since this is a command line utility.  The output of the “Phoenix 1”  BIOS is shown below.  If you don’t know your BIOS’s info please checkout our previous post on how to access BIOS information.


image


There are other ways to unlock a BIOS password like putting the jumper on reset pins of motherboards.  This will need you to examine your motherboard’s manual to see where the pins are and where to put the jumper.  This is usually put near the BIOS chip so it will be easy to spot.

Manufacturers also provide a master password.  You can try this list provided by www.biosflash.com:

http://www.biosflash.com/e/bios-passwords.htm

How to Use MSCONFIG in Windows XP and Vista


If you have ever had a tech support call regarding what programs start, when you boot up Windows XP, you may have heard the term MSCONFIG.  Perhaps you were instructed by a technician where to go and what to do with this tool.  Granted, this is not necessarily something that one would use on a daily basis.  However, there are occasions when MSCONFIG is quite useful, providing there is practical information on how to utilize it.

Before we get into what MSCONFIG is used for, we need to know how to access it.  This is accomplished by left-click on Start, then Run.  While in the Run dialog box, type in MSCONFIG (it is not case-sensitive) in white space, then left-click on Ok.  It is important to note, before proceeding, that any changes made in MSCONFIG require a reboot before they are permanent.

msconfig1

msconfig2

A medium-sized window will pop-up on your screen, with a selection of six tabs.  The first tab, which is selected by default, is the General tab.  Is this view, you will see three selectable radio buttons under the Startup Selection heading.  Normal Startup will be selected if you have never used MSCONFIG.  Diagnostic Startup will start Windows XP up in a “stripped down” functionality mode, akin to a Safe Mode startup.  If you choose this option, remember to change it back when you are done troubleshooting, or Windows will keep starting up in this manner.


If one does not encounter the Normal Startup being selected in MSCONFIG, they will see the Selective Startup having the dot next to it.  This means that something has been altered with Windows, and only the active items will start.  Not to panic though, it may have been as simple as a startup item being removed from its list.  Maybe the BOOT.INI file was modified to allow different boot option with Windows.

While I do not intend to get too deep into the nuts and bolts of the SYSTEM.INI, WIN.INI, and BOOT.INI tabs, I do want to show an example of what a typical BOOT.INI screen looks like.  In this screen shot, we see some standard boot commands with a Windows XP Professional setup on a single hard drive.


One of the reasons is that I would not want a computer user to venture boldly into the WIN and SYSTEM settings, is that any small change may cause Windows to break and sink faster than the Titanic.  I do not believe there is enough room in this post for all the documentation.  I recommend consulting your local computer technician or the Microsoft Knowledgebase.

Oddly enough, the next tab over, Services, has a feature that I personally believe should be available in the other dangerous areas.  In the Services tab, you see all of your computer’s services relating to Windows, and any other program on your machine that is installed as a service.  The nice item in this screen is the Essential column heading (screen shot annotation #1).  This annotates that a listed service is necessary to run Windows.  Should you deselect it, well, it goes without saying that things, not necessarily good ones, will happen.


While in the Services tab, you can look at any non-Windows service by left-clicking on the Hide All Microsoft Services checkbox (screen shot annotation #2).  Doing this is not damaging to Windows, it is simply a toggle switch.  You can also Disable All (screen shot annotation #3) services if you want to, enough said.

The last tab in MSCONFIG is one of the more frequently visited areas.  The Startup tab controls what programs start with Windows.  If you want a program to not start alongside Windows, simply uncheck the box on the left-hand side of the window, under Startup Items, and it will not start with Windows.  Following the columns to the right, you will notice the program or command that runs with the start item, as well as the actual location in the Windows Registry where a reference is for that item.

msconfig6

There are exceptions to the MSCONFIG rule of stopping startup programs.  Various computer viruses, Trojans, and Spyware programs insert themselves into the Startup list, and are capable of self-repair.  If you uncheck a suspicious program from the Startup list, only to look at MSCONFIG after a reboot, and it is still checked, there is a possibility that you have a malicious program on your computer.

It is also possible that if you update certain programs, like Adobe Acrobat Reader, it will reinsert items into the startup list after updates are run.  However, as shown in the screen shot above, programs like Adobe are easy to spot on the Startup list.

File Conversion for Free! Convert Any File to Anything!


Well, there is a web site called ZamZar and it’s a completely free tool that you can use to convert between just about any possible type you can think of! They have all the document types, image types, music formats, and video formats! This is so much better than those commercial apps that only convert between specific formats and they cost some!

And it’s terribly easy, off the main page, just browse for your file, pick what you want it converted to, enter your email address and click Convert! I tried to convert a PDF to Word and it took about 1 minute to upload the file, receive an email and download the converted file! Now that’s a cool service. So if you or your business needs to convert files, this is the place to go!


Enjoy!

How to Recover the Volume or Sound Icon to Your Windows Taskbar


Don’t you hate it when need to adjust the volume on your computer only to find that the icon is missing from your taskbar? Here’s a quick tip that I thought I would write since it happens to me all the time! The process for getting back your volume icon is not very complicated, so here it goes!

First, click on Start and then Control Panel to get to the computer settings:


Next, click on the Sounds and Audio Devices icon in the Control Panel. If you don’t see the icon, you may be in Category View. Switch to Classic View by clicking the first option at the top left.


Personally, I like Classic View better since it’s easier to get to what you want quickly. Once you open the dialog, you should already be on the Volume tab.


You’ll notice the “Place volume icon in the taskbar” option is either checked or unchecked. If it’s already checked and the icon is not showing up, you need to uncheck the box, and then click Apply. Re-check the box and then click Apply again. Now your icon should appear in the taskbar.


That’s it! Sometimes this happens a lot, especially after you restart your computer or log off. If It it keeps disappearing over and over again, you need to update the driver for your sound card. You can do this by going to the computer manufacturer’s web site and downloading it from there, i.e. Dell support, etc.

10 Essential Skills for Windows Users


This is quite understandable, as Windows itself doesn’t come with any kind of user manual, except for the Getting Started digital software guides that Microsoft offers with some of their products. For today’s post, we will cover 10 essential skills that every Windows user should know, based on SEO demand.

Windows High Tech

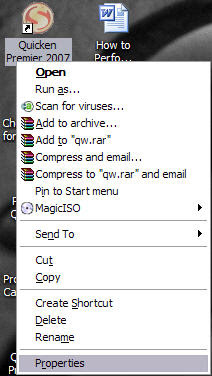
1. Run as Administrator

In some cases, you may need to run a program as administrator in order to access it. By opening the app as an administrator, you are simply accessing the program using higher privileges, which some apps require.

To run as administrator, simply right-click the program or app and select Run as administrator from the right-click menu. This will launch the program in administrator mode.

Run as Admin

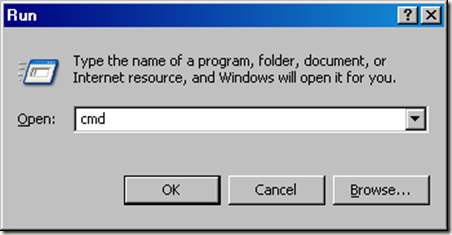
2. Open an Elevated Command Prompt

Following the Run as Administrator step (1.), there may also be some cases where you need to use Windows to open an elevated command prompt. Using what you learned about Run as Administrator, you can also use to open the prompt.

To open an elevated command prompt, launch the start menu and type the term command prompt into the search box. From there, right-click the command prompt listing from the search results and Run it as administrator.

Elevated Command Prompt

3. How to Print Screen (Screen Capture)

To take a screen capture in Windows, you can simply press the PRINT SCREEN/PRTSC/PRTSCN button on your computer’s keyboard. This will take a full view screenshot of whatever is active and open on the PC.

Alternatively, you can press the ALT + PRINT SCREEN buttons on your keyboard to take a screenshot of only the active window.

From here, you can simply paste the copied image into an application.

PRNT SCREEN

4. Change Your Windows Account Password

If you would like to change your Windows account password, the simplest way to do it is to use the Start menu search function. Simply click the Start button and type the term change password into the Search programs and files box.

Select Change your Windows Password from the search results.

Alternative method: Simultaneously, press the CTRL + ALT + DELETE keys on your computer’s keyboard. Select the Change a password option.

Windows 7 Change a Password

5. Install Fonts

Installing fonts in Windows is quite simple. Once you’ve downloaded a font that you would like to install, simply right-click on the font file and select Install from the context menu.

Also note, if you want to install multiple fonts, you can select them all, right-click and use the above method.


6. Show Hidden Files

By default, Windows doesn’t display every file that is on the system. In some cases, you may need to show hidden files in order to access key files for the Windows operating system.

To show hidden files, navigate the path Start > Control Panel > Appearance and Personalization > Show Hidden Files and Folders. Click the OK button.


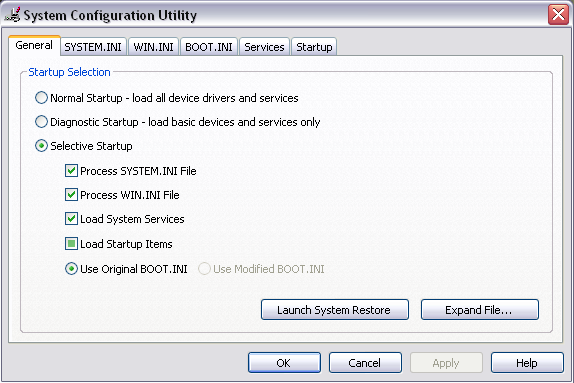
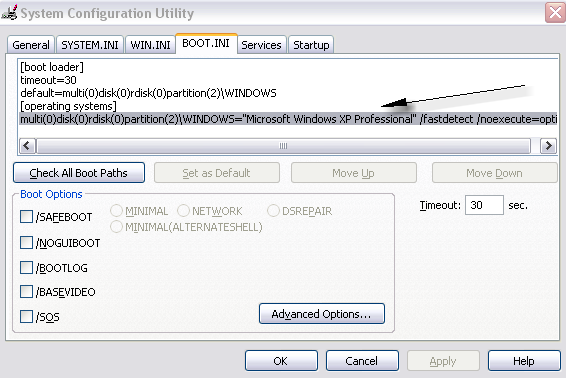
7. How to Set and Adjust Windows startup programs.

By default, many programs or apps that are installed in Windows auto set themselves to launch every time you start your computer. If too many programs are set to run with Windows automatically, it can slow your computer down significantly.

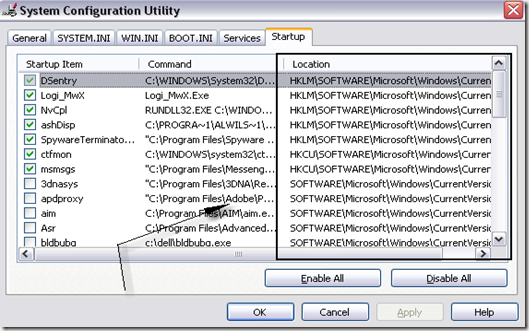
To set Windows startup programs, launch the Start menu and search for the term msconfig. Select msconfig from the search results to launch System Configuration.

On the first tab, General, select the Selective startup option. Next, click the Startup tab, where you can toggle on or off startup programs.

System Config

8. Restart Windows in Safe Mode

Windows Safe Mode has various purposes, but it is commonly used as a less resourced boot of Windows that only loads essential Windows services. Safe Mode is commonly used to diagnose viruses and malware.

To restart in Safe Mode, click the Start Menu and restart your PC. When your PC shuts off and then begins to boot back up, press the F8 key on your keyboard. This will open the Advanced Boot Options menu, where you can boot into Safe Mode.


9. How to use Windows System Restore

The Windows System Restore option allows you to revert the base operating system back to an earlier time, while leaving photos, documents and other files intact.

To launch Windows System Restore, open the path Start > All Programs > Accessories > System Tools > System Restore. Alternatively, you can simply use the Windows search function with the term system restore to jump directly to the utility.

System Restore Window

10. Boot from CD or Disc

Booting Windows from a CD or Disc is a slightly different process, depending on what particular PC you have. To get started, insert the CD/Disc into the optical drive and restart your computer.

When the PC starts back up, you will see a BIOS screen that prompts you to press a key to access the BIOS. Press the specific key that is listed to enter the BIOS.

Locate the boot options in the BIOS and select the option Boot from CD/Boot from Disc/Boot from Drive/ Boot from (Drive Letter), or similar.

From here, Windows will boot from the disc rather than the OS.

Windows BIOS

That’s basically all there is to it. With the above, essential skills for Windows users mastered, you should have no problem with the majority of Windows tasks.

How to Setup Gestures for Your Laptop’s Touch Pad


Here’s something that might make your life a little easier if you’re a big time user of the touch pad – Gestures! It’s a great little feature that I learned a few weeks back and I have found to be very useful for opening my most common programs. Basically, Gestures allows you to assign actions, such as opening a program, to each corner of your touch pad so that when you tap the upper left corner, you can have it open Internet Explorer automatically!

In order to setup Gestures, go to Start, Control Panel and then click on Mouse. Click Switch to Classic View if you don’t see icons. Click on the Gestures tab.


In the dialog, you can click the drop down menu and choose Run. Do that for all four of the buttons if you like, and then click the large Run button at the bottom.


Click the Browse buttons and go to the location of the program file for the application you want to run. If you’re not sure of the location of the .exe file, you can figure it out by right-clicking on the shortcut that’s on your desktop and choosing properties. For example, if I want to be able to load Quicken 2007 and need to find it’s path, I would go to my desktop and right click on the icon and choose Properties.


And you’ll get a dialog that shows where the shortcut actually points to. This is where you would browse to from the Gestures tab.


Once you select the application file, click OK and set the rest in the same way. Click OK again and give your new shortcuts a try! Tap one the corners on your touch pad and that program should load up for you!

You can also setup scrolling using the touch pad also. Check the Use Scroll Function and click Settings to either narrow or widen the scrolling area to fit your preferences.

How to Speed Up Mozilla Firefox


Please note that if you do not have firefox as your default browser, I advise you to get it immediately. It is faster and more efficient than every browser out there. It is obtainable at mozilla.org/firefox.

If you use all the methods put together, you should be able to see a speed increase of at least 50% on Firefox.

Method 1:

Okay, well. To begin with, I will tell you how to increase your bandwidth speed by 20%.

Windows actually reserves 20% of your bandwidth for purposes I will never know. I’ll show you in a few easy steps, how to reclaim it.

Step 1:

Click “Start“, and go on “Run“, and type in “gpedit.msc“. You should see this:

gpeditmsc

Step 2: You should see a thing called ‘Group Policy’ open.

Step 3: Double-Click on “Computer Configuration”.

Step 4: Double-Click on “Administrative Templates”

Step 5: Double-Click on “Network”

Step 6: Double-Click on “QOS Packet Scheduler”

Step 7: Double-Click on “Limit Reservable Bandwidth”

Step 8: Check the box that says ‘Enabled’ and change Bandwidth Limit (%) to 0.

You got 20% increase on your bandwidth speed! Easy, was it not?

Method 2:

The next way is to modify the amount of requests can accept at once. By changing it to a very high number (30+), you should see a massive rise in speed.

So, to this, I’ll put it in a few easy to follow steps.

Step 1: Load up Mozilla Firefox. Now, in the address bar, type “about:config” (Without the ” ” of course). You should see this:

aboutconfig-addressbar

Step 2: Scroll down the page until you find browser.tabs.showSingleWindowModePrefs, and then double-click it. This will set it to “True”.

Step 3: Next, scroll down look for the line that says network.http.pipelining, and double-click this. This will set this to “True”.

Step 4: Now, scroll down and look for network.http.pipelining.maxrequests. Once you have done this, double-click it, and a box will pop up. Change the number to 60.

Close Firefox. You will now experience a 10% to 40% increase in speed.

Method 3:

Finally, the last way to increase your speed, is by using an add-on for Firefox, called FasterFox. It’s increased my speed greatly. Although, my friend, who owns a weak computer, said it doesn’t work well for him, so if your computer is weak, you may want to stop here.

FasterFox basically increases your speed by recycling all the idle bandwidth not doing anything, and makes it load your pages faster.

fasterfox2

You can get FasterFox at http://fasterfox.mozdev.org/.

Install it, and your done! Hopefully, you now have a faster running Firefox! Any other ideas, post a comment!

Add Launchpad Style Application Launcher to Windows 7


Opening programs and launching applications in Windows is usually done using the start menu or taskbar. However, if you have several apps installed, or would prefer a slightly different interface for deploying your favorite programs, you may want to consider using an application launcher.

This is a simple way to make Windows more fluid. Not sure what an application launcher is? It’s similar to the Launchpad feature in Mac OS X Lion, or the home screen on a smartphone; basically, a grid that is composed of several programs and apps.

Launchpad for Mac Lion

ViPad is a quality freeware application that adds a nicely designed application launcher to Windows 7. To get started, jump to this page at LeeSoft and download the latest version of ViPad.

ViPad

The program is fairly light, so it should download very quickly. Once the download finishes, double click the application to start using ViPad.

Windows ViPad Downloaded

From here, proceed to install ViPad as you would any other app. You will be presented with the basic installation wizard.

ViPad Setup

With the program successfully installed, you will simply be presented with a blank canvas, as you have not yet added any apps.

ViPad Running

To add an application (shortcut) to ViPad, simply locate the program on your PC and drag the app to the ViPad. You can locate specific applications using the path Start > All Programs. Here, we’ve added Spotify.

Alternatively, you can remove an application from ViPad by right-clicking it and selecting Remove from the context menu.


You can also right-click on the New Tab listing to rename the tabs to whatever you’d like. Also, clicking the + button allows you to add more panels (screens) to the application launcher. Here, we’ve simply re-named New Tab to Music and created another tab titled Photography. Here are each of the tabs:

Music Tab


Although the actual app usage is very simple, ViPad also offers some more advanced options, which are accessible by double clicking the circle located towards the bottom of the ViPad window.

ViPad Options

That’s basically all there is to it with ViPad. This app is not very complex, but it does offer a great foundation for launching apps and programs more quickly and fluidly within Windows 7. From our demo, you can also use the tabs feature on ViPad to add more structure and organization to your favorite applications. We sorted the programs into purpose, such as Music and Photography apps, but you could setup the tabbed structure for your specific preferences.

Use Windows Defender Offline Tool to Fix an Infected PC


Luckily, Microsoft released a cool offline version of Windows Defender that scans your system outside of Windows and removes any infections. Then you can start up your computer and the malware will be gone and hopefully your system will start up normally! That’s pretty cool and definitely better than having to reinstall everything.

To get started, go ahead and download the Windows Defender Offline tool here:

http://windows.microsoft.com/en-US/windows/what-is-windows-defender-offline

The way it works is that you download a program that will help you create a CD/DVD or USB bootable media that runs Windows Defender. You’ll create the media and then boot your computer from the CD or USB drive, which will then scan your system and fix any problems.

Once you download the 32 or 64-bit version, run the program and you’ll see the welcome screen:

windows defender offline

Go ahead and click Next to get started creating the offline media. Once you accept the license agreement, you’ll be given the option to install Windows Defender Offline on a CD/DVD, USB flash drive, or to download an ISO file.

remove malware

I installed it on a flash drive, which will have to be reformatted in order to install Windows Defender Offline. You only need about 250 MB of free space on the flash drive, but it will still format the entire thing.

reformat usb

Click Next and the process will start. It will download, then process the files, then format the USB drive and then install the files.

install windows defender

Once it’s complete, you will see the instructions for how to use the new media:

usb flash drive

Now you can boot up using the media and you’ll get the familiar Windows Defender screen. Note that all the definition files are downloaded when you use the install tool. You don’t need an Internet connection or anything in order to update the definition files. If you need to run the tool again at a later time, you need to create the media again because it will download the latest files and then create the bootable media.

windows defender

Hopefully, the next time you have a problem with your computer and you know it’s spyware or malware, you can use the offline tool to disinfect your system. If you have any questions or problems using the tool, feel free to post a comment! Enjoy!

Fix Delay When Typing in Windows


In this article, I’ll try to go through all the different reasons why you could be having this problem and how to solve it, if possible.

Hardware – Graphics Card

Even if you have a fast processor, the delay between your keyboard and screen could be caused by having an integrated graphics card. Integrated graphics cards are much cheaper than a dedicated graphics card and can be the bottleneck in the whole transfer of your typing into words on the screen. This is especially true if you type really fast, i.e. 40+ words a minute. If you didn’t have this problem before and now you’re having it all of a sudden, then it’s probably not the graphics card, so keep reading.

Hardware – Memory Module

Even though this is rare, if you have a faulty memory module or a memory module that is not properly seated, then one of the manifestations of that could be delayed typing. If you know how to check your memory, it’s a good idea to take the chips out and put them back in one by one and see if makes any difference.

You can also run a memory diagnostic on your compute using a free program called Memtest86. You can download it here:

http://www.memtest.org/

Software – Lack of Resources

The other main culprit is simply lack of system resources. It doesn’t matter how much memory or how fast your processor is, if all the RAM is being used and the CPU is running at 100% utilization, then you’ll see lag not only if typing, but in doing normal computer activities. On a Windows machine, go ahead and open task manager by pressing CTRL + SHIFT + ESC.

task manager

Go ahead and click on the Performance tab and you’ll see a few graphs for CPU Usage and Memory. Make sure are not completely green, meaning being completely utilized. If you see your CPU usage is anything over 50% consistently, then you have to determine which program(s) are causing the spike and either remove them or disable them.

This can also be caused on systems that have a lot of malware installed or have a virus. If you suspect any type of computer infection, try to remove that first.

Lastly, make sure you disable any CPU-intensive programs like anti-virus software. A lot of times anti-virus software can go crazy and start scanning everything under the sun and it can really slow the system down. If you have anti-virus running, try disabling it and see if the delay in typing goes away.

Software – Clean Boot
If you have determined that it’s something to do with Windows, then the next step is to perform a clean boot. A clean boot basically disables all startup items and all non-Microsoft services and then starts up the computer. You can read step by step instructions on how to perform a clean boot here:

http://support.microsoft.com/kb/929135

If you find that there is no typing delay after a clean boot, then you know either a service or a startup program is causing the problem. You’ll have to follow the directions on how to enable items one by one to figure out what specific process or service is slowing down the system. It’s a little time intensive, but it’s better than having to reinstall Windows.

If you have a computer from HP or Dell, it’s probably full of bloat-ware. It may be a good idea to simply perform a clean install of Windows if you have the time, patience and knowledge. You can go through and uninstall all that extra stuff too, but it usually ends up staying in your registry.

Both WiFi and LAN Enabled
It has also been confirmed that this issue can occur if you have both WiFi and LAN enabled on your Windows PC. Go ahead and disable one network connection, then restart and see if the issue occurs.

Other Issues
- Make sure you are not running out of hard disk space. If you are low on hard disk space, go ahead and use a program like CCleaner to delete temp files, etc. Uninstall some programs to free up space.

- Update all drivers on your computer. A few people have said updating their graphics card and other hardware drivers fixed the problem. If you are using a special keyboard of some sort, make sure you download the latest driver for that.

- If you’re using a wireless keyboard, try a keyboard that plugs in directly to the computer and see if the issue goes away. It could be a problem with the wireless keyboard.

- If you’re using a laptop and getting the delay, try taking out the battery and see if the delay in typing goes away. Oddly, some people said taking the battery out fixed the issue.

Find this on Google+